Monday, December 12, 2011

Lussekatter - St Lucy Buns

December 13th is the feast day of St Lucia (St Lucy). St Lucy is my confirmation saint. It was also the day I was given my precious and precocious Lucy Cat by a good friend of mine. So in honour of all the Lucy’s I decided to bake some traditional feast day buns. Set aside a morning or an afternoon to make these – the dough needs time to raise, and it also takes time to shape them. (though you could just make them in normal bun shapes, but IMO they just wouldn’t be the same.)

These are called Lussekatter which translates to Lucy Cats ... I am not sure what connection St Lucy has with cats other than these delicious light saffron buns. Try one still warm from the oven – heaven!


Lussekatter
1 kg white flour (plain)
500ml milk
45-50 g yeast
a little white sugar
1 egg
2 g saffron
150 – 200 g butter
200 – 300 ml sugar

  • Dry saffron in warm oven. Grind fine with a little sugar in a mortar and pestle
  • Dissolve yeast in warm water with a little sugar & leave to activate
  • Melt butter in a pot and pour in milk and warm to lukewarm
  • Blend saffron into milk. (The groundsaffron can also be diluted in a little
  • schnapps or cognac and poured into the milk mixture.)
  • Pour liquid into mixing bowl and stir in flour, a little at a time, until a loose, thick,
  • smooth batter forms
  • Blend in the yeast, sugar, egg and then more flour, a little at a time
  • Knead vigorously, adding flour as needed until the dough is smooth, thick and shiny
  • and doesn’t stick to the bowl ... for the breadmakers out there – this will be a very soft moist dough – resist the urge to overflour it – keep kneading!
  • Sprinkle top of dough with a little flour and place a clean dishcloth over the bowl and
  • leave it in a warm place and let rise until double in size (can take up to an hour)
  • Turn out onto board and break off pieces ofdough and roll with hands into 4 in. (10 cm) long and ! in. (1.5 cm) thick ‘ropes’ (note most of mine were that size, but I did make a small batch of larger ones as well - you can see one at the back of the plate - they will take a little longer to cook)
  • Coil each end in, making a figure “S”.
  • Place one “S" cross-wise on top of anotherand place on a greased baking sheet
  • Press a raisin into the centre of each spiral
  • Cover and let buns rise until about double in size (until they feel spongy when pressed lightly with finger)
  • Gently brush a lightly beaten egg onto thebuns
  • Bake at 375°F (190°C) The buns should have a nice golden brown colour and feel light when done (approximately 10 minutes)
  • Place buns on a soft cloth, cover with aclean towel and let cool

recipe from: Ingrid Kroll, 2005. Recipe adapted from
Stora Kokboken: Hushållets Uppslagsbok i Alla Matfrågor. Wezäta Göteborgslitografen. Göteborg, 1945

Saturday, December 10, 2011

Haupia - Christmas style :)

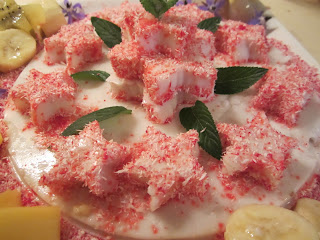
 Am just about to head out the door to a Christmas dinner with some of the neighbours. It's a pot-luck affair & I elected to bring dessert. Of course - what else would I bring lol? I racked my brains about what to bring and then decided to do a test run of the haupia for another friends Christmas party next week which has a Hawaiian theme. Haupia is a sort of set-custard made of coconut milk and is really quite delicious. I paired this with some tropical fruits, and some red-coloured dessicated coconut and came up with this fruit platter. I think I could have done a much better job with the presentation, but given this is the first time I have made haupia I think I did OK.

Haupia

4 cups of coconut milk (which is about 2 cans)
2 1/2 cups water
1 1/4 cups sugar
1 cup cornflour

Combine the coconut milk and water. Stir till smooth, add in the sugar and cornflour. Cook over a low heat, stirring until it turns thick and shiny. (A bit like making a white sauce!) Pour into a clean baking tray and cool to room temperature, before chilling in the fridge. The haupia will set - it will be wobbly like a gelatin-based pudding but quite soft.

I then used cookie cutters to cut one of my haupia slices into christmas stars, and coated them with dessicated coconut and arranged some tropical fruits around it on the platter.

I even cut my kiwi fruit into little stars :)
 

Tuesday, December 6, 2011

Cucumbers - KOVÁSZOS UBORKA

SUCCESS!!! I did it - I made Hungarian fermented/pickled cucumbers - and they taste AMAZING. It's not just me saying that, either, an independent tester also found them yummy!

They were amazingly easy to make - and I can't wait to get my hands on some more baby cucumbers to make some more. These won't last long around here... we've already hooked into them this afternoon and at dinner time :D


The recipe is  from Zsuzsa and her wonderful blog at http://zsuzsaisinthekitchen.blogspot.com/2011/08/fermented-pickles-kovaszos-uborka.html